

1. Import and Configure a vCenter Orchestrator Package
You import a VMware® vCenter™ Orchestrator™ workflow and its resource files. You then update
the workflow resource file to reflect your predefined machine names and edit the configuration
element used by the workflow.
On your desktop system, select Start > All Programs > VMware > vCenter
Orchestrator Client, if the vCenter Orchestrator client is not already running. > In the vCenter Orchestrator Login dialog box, log in.
a. Type the host name vcacFQDN
b. Type the user name Administrator@vSphere.local.
c. Type the password as assigned
In the upper-left corner of the vCenter Orchestrator Client window, select Design from the
drop-down menu. > In the left pane, click the Packages tab. > In the left pane, right-click in an empty area and select Import Package

In the Open dialog box, browse to Desktop\Labfiles\Extensibility Laband select
de.sva.vcac.network.package_v0.1.package. > Click Open. > In the Import package dialog box, click Import.


Click Import Selected Items.

name.
Example: If your name is John and your vCenter Automation Center server is vCAC02, you
change the preregistered machine names to John02-VM1, John02-VM2, and so on.

In Notepad, select File > Save As and save the file to the desktop as Network.csv. > Close Notepad. > Restore the vCenter Orchestrator client from the taskbar. > Click the Resources tab. > In the Resources tab, expand Administrator@your_vCAC_server > vCAC. > Right-click the Network.csv file and select Update resource. > In the Open dialog box, select the Network.csv file from the desktop and click Open. > Right-click the Network.csv file in the vCACfolder and select Save to file. > From the Look In drop-down menu, select Desktop and change the filename to
Network_1.csv. > Click Save.


2. Customize a vCloud Automation Center Workflow Stub
You customize the Building Machine workflow stub in VMware vCloud® Automation Center™ to
call a vCenter Orchestrator workflow. The vCenter Orchestrator workflowsets the static IP
properties of any predefined machine provisioned from a blueprint that references the
BuildingMachine stub.
On the desktop, select Start > All Programs > VMware > vCAC> vCAC Designer. > On the Designer ribbon, click Load. > In the Load Workflow dialog box, select the initial revision of the WFStubsBuildingMachine workflow stub. > If multiple versions of this workflow exist, select the revision 0version. > Click OK > In the Try area, double-click the Building Machine activity.


variables.


activity and dragging the connecting line to the InvokeVcoWorkflow activity. > Click the select a vCenter Orchestrator Workflow ellipsis button in the InvokeVcoWorkflow activity. > Select the GetNetworkFromFile workflow. > Click OK


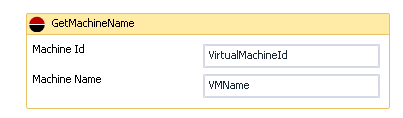
In the InvokeVcoWorkflow activity, type VMName in the VMName text box under Inputs. > In the InvokeVcoWorkflow activity, provide the following values in the text boxes under Outputs. > Verify that the completed Outputs area looks like the screenshot.


Select the LogMachineEvent activity and set the following properties in the Properties pane.


LogMachineEvent activity and dragging the connecting line to the Flowchart activity

the Properties pane.


under SetIP. > Connect SetIP to SetMachineProperty by pointing to the bottom of the SetIP activity and dragging the connecting line to the SetMachineProperty activity.


under SetNetworkName. > Connect SetNetworkName to SetMachineProperty by pointing to the bottom of the SetNetworkName activity and dragging the connecting line to the SetMachineProperty activity.


connecting line to the If activity.


Select the If activity and set the following properties in the Properties pane.


54. In the Toolbox pane, select the If activity and drag it to the design surface under
SetPrimaryDns. > Connect the SetPrimaryDns activity to the If activity by pointing to the bottom of the SetPrimaryDns activity and dragging the connecting line to the If activity.

Select the If activity and set the following properties in the Properties pane.


You attach the state change workflow to a blueprint.
Login with Tenant-admin
https://vCACFQDN/shell-ui-app
Username = tenant-admin@vclass.local
Password = as assigned
Click the Infrastructure tab. > In the left pane, select Blueprints > Blueprints. > From the list of blueprints, select the Windows 2003 Basic blueprint and select Edit. > Click the Properties tab and click New Property. > Add two custom properties to the blueprint with the following details


Login with bg-admin
https://vCACFQDN/shell-ui-app
Username = bg-admin@vclass.local
Password = as assigned
Click the Catalog tab. > In the list of blueprints, select the Windows 2003 Basic blueprint and select Request. > In the Machine name text box, type your_first_name+vCAC_server_number-VM1.
Example: If your name is John and your vCloud Automation Center server is vCAC02, the
machine name should be John02-VM1.
The name that you type here must match one of the names that you provided in the
Network.csv file in task 1
Click Submit. > Click OK.


You must refresh the page every few minutes until the status is Successful. Although
provisioning varies with your environment, this machine takes about 8 minutes to deploy
Click the Items tab to identify your newly provisioned machine.
Open another browser tab and access the VMware vSphere® Web Client.
a. Go to https://vcva.vclass.local:9443/vSphere-Client.
b. Type the user name vs-admin@vclass.local.
c. Type the password = as assigned
e left pane of the vSphere Web Client, select vCenter > VMs and Templates. > Select VM > Open Summary Tab > Verify IP of the Machine is matching with Network.csv file IP.

No comments:
Post a Comment