
This post is the first of a series which aims to assess the performance of the VMware vSphere Content Library solution in various scenarios and provide vSphere Administrators with some ideas about how to set up a high performance Content Library environment. After providing an architectural overview of the Content Library components and inner workings, the post delves into the analysis and optimization of the most basic Content Library operation, i.e., the deployment of a virtual machine.
Introduction
The VMware vSphere Content Library empowers vSphere administrators to effectively and efficiently manage virtual machine templates, vApps, ISO images, and scripts. Specifically an administrator can leverage Content Library to:
- Store and manage content from a central location;
- Share content across boundaries of vCenter Servers;
- Deploy virtual machine templates from the Content Library directly onto a host or cluster for immediate use.
Typically, a vSphere datacenter includes a multitude of vCenter servers, ESXi servers, networks, and datastores. In such an environment it can be time-consuming to clone or deploy a virtual machine through all the ESXi servers, vCenter servers, and networks from a source datastore to a destination datastore. Moreover, this problem is compounded by the fact that the size of virtual machines and other content keeps getting larger over time. The objective of Content Library is to address these issues by transferring large amounts of data in the most efficient way.
Architectural Overview
Content Library is composed of three main components which run on a vCenter server:
- A Content Library Service, which organizes and manages content sitting on various storage locations;
- A Transfer Service, which oversees the transfer content across said storage locations;
- A Database which stores all the metadata associated with the content (e.g., type of content, date of creation, author/vendor, etc.)
The architecture diagram in Figure 1 shows how the three components interact with each other and with other vCenter components, along with the control path (depicted as thin black lines) and data path (depicted as thick red lines).

Figure 1. VMware vSphere Content Library architecture
The Content Library Service implements the control plane that manages storage and handles content operations such as deployment, upload, download, and synchronization. The Transfer Service implements the data plane that is responsible for actual data transfers between content stores, which may be datastores attached to ESXi hosts, NFS file systems mounted on the vCenter Server, or remote HTTP(S) servers.
Data Transfer
The data transfer performance varies depending on the storage type and available connectivity. The Transfer Service can transfer data in two ways: streaming mode and direct copy mode. The diagram in Figure 2 shows how the two modes work in a data transfer between datastores.

Figure 2. Content Library Data Transfer Flows
If the source and destination hosts have direct connectivity, the Transfer Service asks vCenter to instruct the source host to directly copy the content to the target host. When this is not possible (e.g., if the two hosts are connected to two different vCenter servers) streaming mode is used instead. In streaming mode the data flows through the Transfer Service itself. This involves one extra hop for the data, and also compression/decompression for the VMDK disk files. Also, vCenter appliances are usually connected to a management network, which could become a bottleneck due its limited bandwidth. For these reasons, direct copy mode typically has better performance than streaming mode.
Optimizing Virtual Machines Deployment
Having covered Content Library architecture and transfer modes, we can now discuss how to optimize its performance starting from the most basic operation, the deployment of a virtual machine. Deploying a virtual machine from Content Library creates a new virtual machine by cloning it from a template. We assess the performance of deployment operations by measuring their completion time.This metric is obviously the most visible and important one from an administrator’s perspective.
The experiments discussed in this blog post demonstrate how deployment performance is impacted by the Content Library backing storage configuration and provides some guidelines to help administrators choose the most appropriate configuration based on performance and cost tradeoffs.
Experimental Testbed
We used a total of three servers, one for running the vCenter Appliance and another two to create a cluster over which virtual machines were deployed from the Content Library. The following table summarizes the hardware and software specifications of the testbed.
| vCenter Server Host | |
| Dell PowerEdge R910 server | |
| CPUs | Four 6-core Intel® Xeon® E7530 @ 1.87 GHz, Hyper-Threading enabled. |
| Memory: | 80GB |
| Virtualization Platform | VMware vSphere 6.0. (RTM build # 2494585) |
| VM Configuration | 16 vCPU, 32GB of memory |
| vCenter Appliance | VMware vCenter Sever Appliance 6.0 (RTM build # 2562625) |
| ESXi Hosts | |
| Two Dell PowerEdge R610 servers | |
| CPUs | Two 4-core Intel® Xeon® E5530 @ 2.40 GHz, Hyper-Threading enabled. |
| Memory: | 32GB |
| Virtualization Platform | VMware vSphere 6.0. (RTM build # 2494585) |
| Storage Adapter | QLogic ISP2532 DualPort 8Gb Fibre Channel to PCI Express |
| Network Adapter | QLogic NetXtreme II BCM5709 1000Base-T (Data Rate: 1Gbps) |
| Storage Array | EMC VNX5700 Storage Array exposing two 20-disk RAID-5 LUNS with a capacity of 12TB each |
Figure 3 illustrates the experimental testbed along with the data transfer flows for the various experiments. We ran a workload that consisted of deploying a virtual machine from a Content Library item onto a cluster. All experiments used the same 39GB OVF template. We conducted various experiments, based on the possible configurations of the source content store (the storage backing the Content Library) and the destination content store (the storage where the new virtual machine was deployed), as shown in the following table.
| Experiment 1 | An ESXi host is connected to a VAAI-capable storage array (VAAI stands for vStorage API for Array Integration and it is a technology which enables ESXi hosts to offload specific virtual machine and storage management operations to compliant storage hardware.) Both the source and destination content stores are datastores residing on said array. |
| Experiment 2 | An ESXi host is connected to the same datastores as in Experiment 1. However, these datastores are either hosted on a non-VAAI array or on two different arrays. |
| Experiment 3 | An ESXi hosts is connected to the source datastore while a different host is connected to the destination datastore. The datastores are hosted on different arrays. |
| Experiment 4 | The source content store is an NFS file system mounted on the vCenter server, while the destination content store is a datastore is hosted on a storage array. |

Figure 3. Storage configurations and data transfer flows
Experimental Results
Figure 4 shows the results of the four experiments described above in terms of deployment duration (lower is better), while the following table summarizes the main observations for each experiment.
| Experiment 1 | The best performance was achieved in Experiment 1 (two datastores backed by a VAAI array). This was expected, as in this scenario the actual data transfer occurs internally to the storage array, without any involvement from the ESXi host. This is obviously the most efficient scenario from a deployment perspective. |
| Experiment 2 | In Experiment 2, although the array is not VAAI-capable (or the datastores are hosted on two separate arrays), the source and the destination datastores are connected to the same ESXi host. This means the data transfer occurs through the 8 Gb/s Fibre Channel connection. This scenario is about 20% slower than Experiment 1. |
| Experiment 3 | The scenario of Experiment 3 is significantly slower (about three times) than Experiment 1 because the datastores are attached to two different ESXi hosts. This causes the data transfer to go through the 1Gbps Ethernet connection. We also ran this experiment using a 10Gbps Ethernet network, and found that the deployment duration was similar to the one measured in Experiment 2. This suggests that the 1Gbps Ethernet connection is a significant bottleneck for this scenario. |
| Experiment 4 | In the final scenario, Experiment 4, the template resides on an NFS file system mounted on the vCenter server. Because the template is stored in a compressed format on the NFS file system in order to save network bandwidth, its decompression on the vCenter server slows the data transfer quite noticeably. The network hops between the vCenter Server and the destination ESXi host may further slow the end-to-end data transfer. For these reasons, this scenario was about seven times slower than Experiment 1. We also ran the same experiment using a 10Gbps network between the NFS server and the vCenter server and measured a completion time only slightly better than with the 1Gbps network (1260s vs. 1380s). Given that compression and decompression are CPU-heavy operations, using a faster network may result in only a marginal performance improvement. |
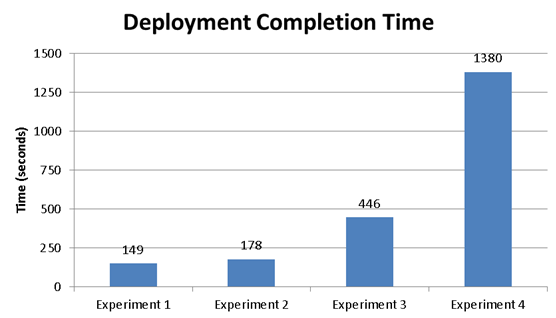
Figure 4. Deployment completion time for the four storage configurations
Conclusions
This blog post explored how different Content Library backing storage configurations can affect the performance of a virtual machine deployment operation. The following guidelines may help an administrator in optimizing the Content Library performance for said operation based on the storage options at her/his disposal:
- If no other optimizations are possible, the Content Library should be at least backed by a datastore connected to one of the ESXi hosts (scenario of Experiment 3). Ideally a 10Gbps Ethernet connection should be employed.
- A better option is to have each ESXi host connected to both the source datastore (the one backing the Content Library) and the destination datastore(s) (the one(s) where the new virtual machine is being deployed). This is the scenario of Experiment 2.
- The best case is when all the ESXi hosts are connected to a VAAI-capable storage array and both the source and destination datastores reside on said array (Experiment 1).
http://blogs.vmware.com/performance/2015/07/efficiently-deploy-vms-vmware-vsphere-content-library.html
